A Beginner's Guide on How to Do a Pull-Up

Pull-ups, along with push-ups, are a fundamental exercise for building upper body strength. Although they require only your bodyweight, most people are intimidated by pull-ups to the point that they never bother to learn how to do them! Despite the common misconceptions, this exercise is not impossible to do. Even those who don't have superior arm and back muscles can achieve mastering a pull-up.
We can't help you achieve a pull-up overnight, or even after a few days, but we can give you tools you can implement into your strength training routine that will help you develop the arm and back strength you need to achieve your first pull-up. Our guide will go through all the most important information about why you should incorporate this exercise into your routine and steps on how to approach pull-ups so you're able to achieve it with proper form and technique.
Why you should do pull-ups
The number one reason you should do pull-ups is that they work your entire upper body. Although it is considered a back exercise since it primarily works the latissimus dorsi (lats), it also helps strengthen other important muscle groups in the upper body. Pull-ups recruits a long list of muscles with includes lats, deltoids, core, traps, pecs, and biceps. This is why bodybuilders and even casual lifters practice pull-ups regularly - they work multiple muscles at once and keep the upper body strong, stable, and functional.
Aside from building great arm and back strength, it's a great move to strengthen your core. Core strength is needed for functional movements like standing, twisting, pushing, pulling, etc. Building a strong core will help improve your posture, can help you lift heavier, and even contributes to good form technique! Doing compound exercises like pull-ups will improve core strength which will reduce your risk of injuries, improve everyday functional movements, and even help improve your training performance. This simple bodyweight exercise does it all!
How to start training to do pull-ups
As simple as this exercise is to execute - involves hanging from a pull-up bar and pulling your own body weight up to the bar - it's not easy. Your arms are essentially lifting your lower body and core, which are much bigger than your upper body. As we said earlier, this exercise is not impossible. To help you master the pull-up with good form, we've put together three training tips along with three modifications you should practice before hitting the pull-up bar.
- Focus on your diet: This one should be obvious, but you can't expect to master a pull-up without following a nutritious balanced diet. For those who have weight loss goals, combine them with your pull-up goal! The more you weigh, the more you have to lift... So, if you want to make pull-ups doable and are already working on your fitness goals, then get your diet under control. It'll help with weight loss and provide your body with the nutrients it needs (like protein and carbs) to perform and recover to its fullest potential.
- Make pull day a priority: If you really want to start attaining your goals to build back muscles or achieve your first pull-up, then start making your pull day a priority. You should always exercise the stuff you want to work on the most first. So, let's say your main focus before was growing your glutes, but now you want to work on your back. Consider cutting down your lower body workouts to just two times a week as opposed to three, in order to fit in an extra pull day a week. Do whatever's necessary to prioritize pulling exercises, just remember to allow your back to recover for 48 hours before doing back-focused exercises again.
- Master the bent-over row and other exercises: You know now that you should prioritize pull day and back exercises, but what exercises exactly should you start practicing? The bent-over row is going to be the first exercise you want to master. If you're relatively new to strength training, start by doing dumbbell bent-over rows, and other rowing movements (like the cable machines or the rowing machine at the gym). Our suggestion is to progress once you can do three sets with 8-15 reps. The easier it gets to pull the weight, level up, and add weight, eventually you'll be able to move to barbell rows to continue building strength on your back. Other back exercises you should practice regularly are lat pulldowns, rear delt flyes, and deadlifts. Aside from back exercises, you should also practice isolated bicep exercises because pull-ups will require the biceps to do some work! On your pull days, start with four back exercises before moving on to a few isolated bicep exercises like bicep curls, hammer curls, etc. Don't forget core exercises! Pull-ups require a strong core, so throw in a few bodyweight core exercises after your leg or pull day.
Pull-up modifications
Aside from the three tips we've listed, there are three training wheels you should try before diving into pull-ups. Yes, we are talking about training wheels like the ones you used as a kid before you learned to ride a bike. Like with most things in life, you need to practice and work your way up to things in order to perfect them. In this case, use these training wheels to help you practice your pull-up form...
1. Inverted rows:
Aside from practicing weighted rows, bodyweight rows make for the perfect precursor to pull-ups! They work the same muscles and have you lifting your own bodyweight, except at a different angle. Plus, you can adjust the height of the barbell to make it the move more difficult as you make progress. The best place to try this exercise is at the gym using a Smith Machine or a sturdy squat rack.
Here's how to do it: Set the bar at a height that is challenging for you enough to complete three sets of 8-10 reps - the higher the bar, the easier it is, and vice versa. Once the bar is set up, get underneath the bar and lie facing up with your feet extended out in front of you. Grab the bar with an overhand grip (palms facing away from you) and slightly wider than shoulder-width. Engage your core and glutes so they're tight, and maintain your body in a straight line. Pull your shoulder blades down and back, and focus on pulling your body up towards the bar with your arms. Pull up until your chest touches the bar.
Once you can do three sets of 8-10 reps lower the bar to make it more challenging.
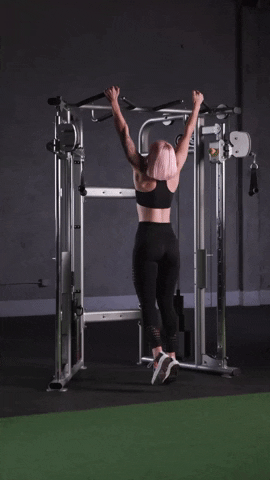
2. Assisted pull-ups:
There are two assisted pull-up variations you can try - using an assisted pull-up machine or using a long resistance band. We suggest starting with an assisted pull-up machine (if your gym has one) because it helps counterbalance weights that make your lifting load lighter. You'll also be able to familiarize yourself with the movement and practice proper pull-up form. To use this machine, simply adjust the amount of weight the machine will lift for you. The lower the pin is placed, the more assistance there is. Set a weight that allows you to perform 10 proper pull-ups. Keep your shoulders rolled down and back, pull yourself all the way up, and then return to the starting position, your arms should be straight. As you progress, you'll start gradually decreasing the weight you're using for assistance so eventually, you won't need the assistance!
A more challenging, but better, training wheel is to practices assisted pull-ups using a long resistance band. Like with the assisted pull-up machine, you'll be able to practice good exercise form except instead of a counterbalance of weight, the band helps by giving you momentum.
Here's how to do it: Loop the resistance band around the pull-up bar or squat rack, making sure that one end is secured around the bar. Place one foot in the loop at the bottom, then perform a pull-up as you would. Remembering to keep shoulders pulled down and back, chest up, neck neutral, and focus on using your lats and arms to pull your body up.
You can also make it more challenging by adjusting the band you use, choosing a lighter band will make it more difficult as opposed to using a heavy resistance band.
3. Negative pull-ups:
Once you can easily do the above two exercises, you can move to the final step - negative pull-ups. This exercise helps to build strength since it uses the same muscles as pull-ups, but it's easier for beginners to perform.
Here's how to do it: Place something sturdy like a box or chair under the pull-up bar. Stand on the box or chair, and with an overhand grip, place your hands wider than shoulder-width apart. Carefully jump up to the top of the pull-up movement so that your chest is touching the bar. Slowly and controlled, begin to lower your body down until you reach the starting position, so you should be standing on the chair or box.
The key is to do the move at a controlled speed, you don't have to go super slow that your body is destroyed after one rep. Once you're able to do three sets of at least 5 reps, along with all the exercises above then you are ready to do a pull-up!
How to do a pull-up with proper form and technique
Before we give you tips on how to do a pull-up, we must tell you the difference between a chin-up and a pull-up so you can decide which one to do! A chin-up requires an underhand grip, meaning your palms face towards you. A pull-up, as we know, requires an overhand grip. Most find chin-ups easier, thus making it a great starting point for beginners, but this is a pull-up guide... So, we'll be giving you step-by-step directions on how to do a pull-up. But feel free to start with chin-ups instead! The directions are the same, the main difference is your grip.
- Step 1: Start from a dead hang
Stand directly below a pull-up bar and place your hands using an overhand grip with your hands slightly further than shoulder-width apart. This is your starting position. You should be hanging underneath the bar.
- Step 2: Set yourself up for success
Engage your core by pulling your belly button in toward your spine (here are more tips on how to engage your core). Pull your shoulders back and down, it should feel as if you're pinching a pencil between your shoulder blades. Make sure the muscles in your arms and back are engaged, tight, and ready to pull you up!
- Step 3: Initiate the movement
Once your set up for success, bend your elbows and raise your upper body toward the bar until your chin is over it and your chest touches the bar. To make it easier, imagine bringing your elbows towards your hips. As you move up, avoid swinging your legs, extending your neck, or shrugging your shoulders up. Your shoulder blades should remain back and down throughout the exercise, and neck neutral. Focus on using your arms to pull yourself up, don't extend your neck to reach the top of the movement.
- Step 4: Finish off strong
Pause for a moment at the top of the exercise, and inhale. Extend your elbows to lower your body to the starting position.
To get the most out of the exercise, go through the full range of motion. It might be harder when you're first starting out, but practice pulling yourself up until the chest hits the bar. If it's still difficult for you, work your way up to it, and continue working on strengthening the muscles in your upper and lower back.
Now you have the tools you need to not only perform your first pull-up but also to perform it with good form and technique! And once you've mastered it and want something more challenging try things up by using a wider grip or doing an isometric hold at the top of the movement. You can even use a weighted belt to add some weight!
Hopefully, you found our pull-up guide informational and helpful! With our tips and tricks, you'll be on the right track to achieving your first pull-up, and don't forget to check out UPPPER's Long Resistance Band collection! You can use our long fabric resistance bands for your assisted pull-up, and other exercises like bent-over rows, bicep curls, and so many more. Available in light, medium, heavy, and extra heavy resistance!
Comments
0 Comments